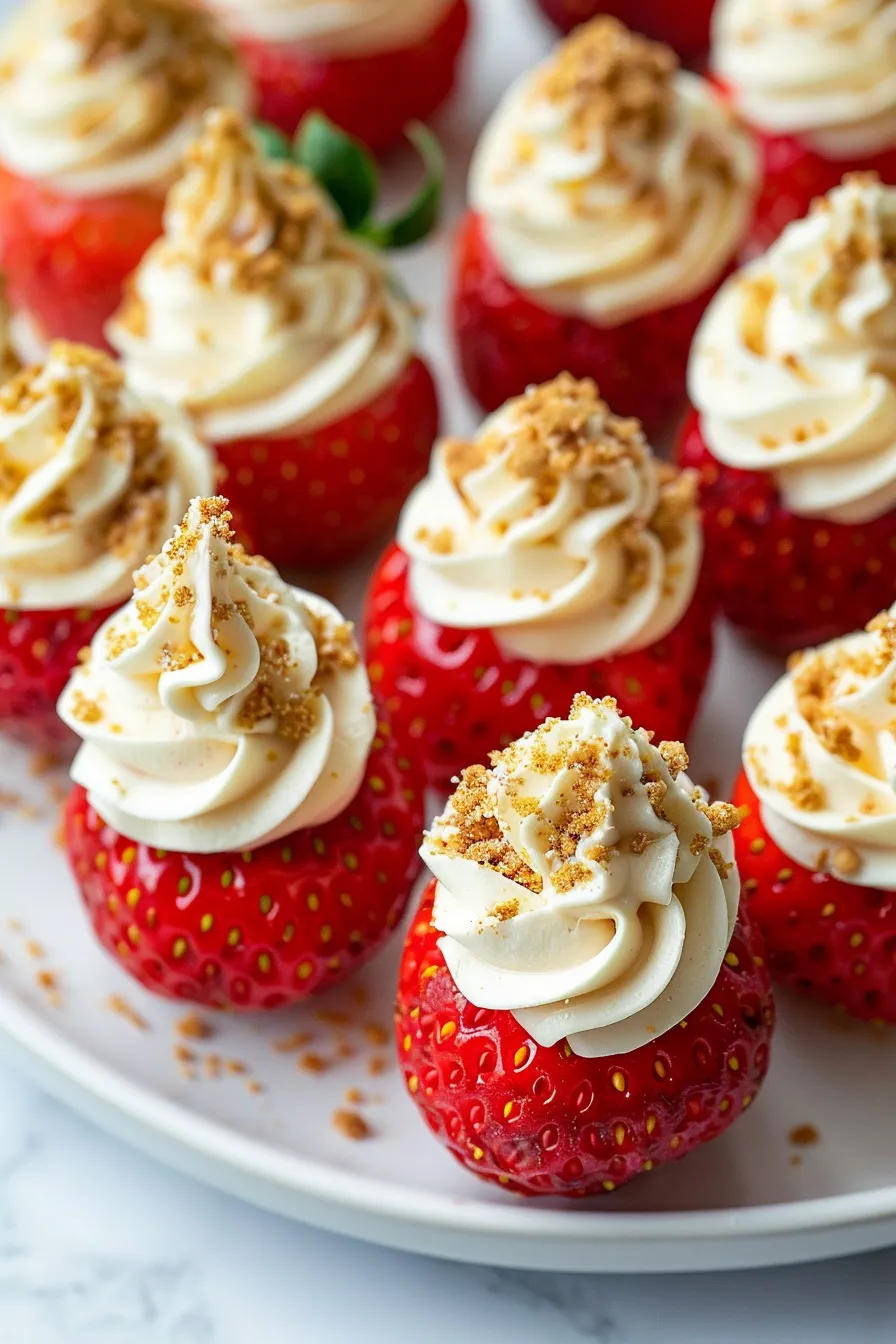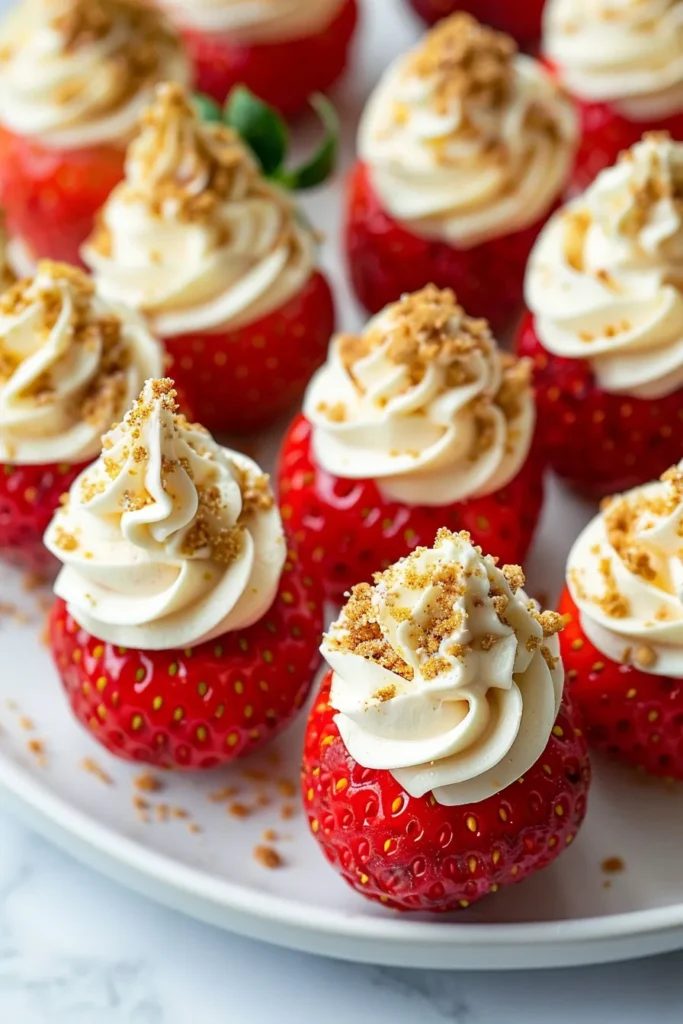
Hi everyone, Emily here! If you’re looking for that “wow-factor” dish that takes about as much effort as a TikTok dance, you’ve found it. These Deviled Strawberries are the 2026 answer to the traditional dessert platter. We’re taking the luscious, tangy goodness of a classic strawberry cheesecake and shrinking it down into a bite-sized, handheld treat. Whether you need a spectacular table display for a summer bash or a quick win for a last-minute potluck, these little gems are guaranteed to be the first things gone.
Why You’ll Love This Recipe
No-Bake Bliss: Keep your kitchen cool—no oven required for these professional-looking treats.
Textural Masterpiece: You get the snap of a fresh berry, the silkiness of cheesecake mousse, and the crunch of graham crackers in every bite.
Crowd Favorite: It’s a “safe” dessert that feels incredibly fancy, making it perfect for feeding a large group with varied tastes.
Visually Stunning: They look like they were catered by a high-end patisserie but cost a fraction of the price.
Equipment
Electric Hand Mixer or Stand Mixer: Essential for achieving those stiff peaks in the whipping cream.
Medium Mixing Bowls: You’ll need two—one for the cream and one for the cheesecake base.
Small Melon Baller: For precisely hollowing out the strawberries without piercing the bottom.
Piping Bag and Star Tip: This is what gives them that “deviled” look. If you don’t have one, a Ziploc bag with a corner snipped off works in a pinch.
Paring Knife: To prep the berries and create a flat base.
Ingredients
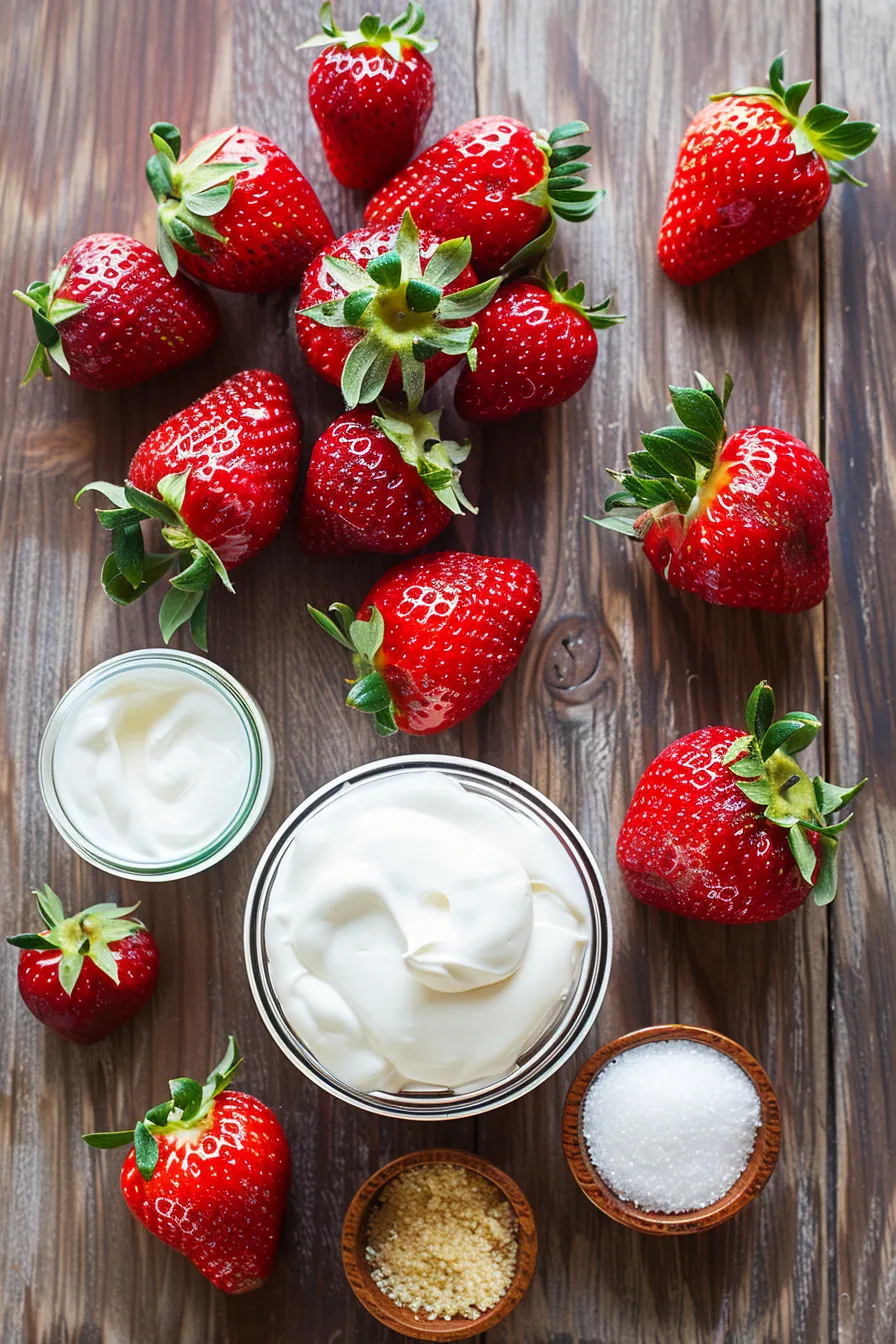
Large Strawberries: 18-24 count; look for firm, bright red berries with green tops.
Heavy Whipping Cream: 1 cup; chilled for maximum volume.
Cream Cheese: 1 (8 oz) package; must be fully softened to avoid lumps.
Sour Cream: 1/3 cup; adds that signature cheesecake tang.
Granulated Sugar: 2/3 cup; for the perfect level of sweetness.
Vanilla Extract: 1 teaspoon; for warmth and depth.
Fresh Lemon Juice: 1 tablespoon (optional); brightens the cream cheese flavor.
Graham Cracker Crumbs: 1/2 cup; for that classic “crust” finish.
Instructions
Prep the Berries: Wash and dry your strawberries. Slice them in half vertically. Cut a tiny sliver off the rounded back of each half so they sit flat on a platter.
Hollow Them Out: Use a small melon baller to create a shallow indent in the center of each half. Don’t go too deep; you just want a little “nest” for the filling.
Whip the Cream: In a medium bowl, beat the heavy whipping cream until stiff peaks form (about 5 minutes). Set aside.
Create the Base: In a separate bowl, use your mixer to blend the softened cream cheese, sour cream, sugar, vanilla, and lemon juice until the mixture is perfectly smooth.
The Fold: Gently fold the whipped cream into the cream cheese mixture using a spatula. Move slowly to keep the filling light and airy.
Pipe it Up: Fill your piping bag (fitted with a star tip) with the cheesecake mixture. Pipe a generous swirl into each strawberry half.
The Finishing Touch: Sprinkle with graham cracker crumbs immediately before serving to maintain their crunch.
You Must Know
Technique Alert: When folding the whipped cream into the cream cheese, do not use the electric mixer. Mixing too vigorously will deflate the air you just whipped into the cream, resulting in a runny filling rather than a stable, pipeable mousse. Ingredient Note: Ensure your cream cheese is at true room temperature; even slightly cold cream cheese will create “beads” in your filling that will clog your piping tip.
Storage Tips
The Berry Hack: You can prep the strawberries a day early! Store them in an airtight container with a paper towel at the bottom to absorb excess moisture.
Make Ahead Filling: The cheesecake mixture stays perfectly stable in the fridge for 24 hours. I recommend piping them no more than 4 hours before your event for the best presentation.
Graham Cracker Timing: Never add the crumbs until right before serving. They will absorb moisture from the cream and lose their crunch within 30 minutes.
Ingredient Substitutions
Low Carb/Keto: Substitute the sugar for a 1:1 monk fruit sweetener and replace graham cracker crumbs with crushed pecans or almond flour.
Extract Swaps: Use almond extract instead of vanilla for a “wedding cake” flavor profile.
Yogurt Swap: You can use Greek yogurt in place of sour cream for a slightly tangier, higher-protein filling.
Serving Suggestions
The Spectacle Table: Arrange these on a slate board or a tiered stand. Garnish the platter with fresh mint leaves for a pop of green.
Chocolate Drizzle: Melt some dark chocolate and drizzle it over the piped filling for an extra layer of indulgence.
Boozy Berries: For an adult-only version, soak the hollowed berries in vodka or Grand Marnier for 30 minutes (and pat dry) before filling.

Cultural and Historical Context
The term “deviled” originally comes from the 18th century, referring to foods seasoned with spicy or zesty ingredients (like deviled eggs). In the modern 2026 culinary landscape, “deviled” has evolved to describe any stuffed finger food that is “halved and filled.” These Deviled Strawberries are a playful, sweet evolution of that tradition, merging the American obsession with cheesecake with the practicality of modern party appetizers.
Seasonal Adaptations
4th of July: Add a single blueberry on top of the cheesecake swirl for a Red, White, and Blue look.
Christmas: Top with a tiny piece of candied ginger or a cranberry.
Valentine’s Day: Dip the bottom of the strawberry in melted chocolate before filling.
Perfect Occasions
Summer Potlucks: They stay relatively cool and are easy for people to grab.
Bridal/Baby Showers: Their elegant appearance fits perfectly with a high-tea or brunch theme.
Game Day: A light, refreshing alternative to the typical heavy, fried snacks.
Freezer Meal Conversion
Do not freeze the finished strawberries. Fresh strawberries turn to mush when thawed. However, you can freeze the cheesecake filling! Place the mixture in a freezer bag for up to 1 month. Thaw in the fridge and give it a very gentle whisk before piping into fresh berries.
Pro Tips
Consistency Check: If your filling feels too soft to pipe, chill the mixture in the fridge for 30 minutes before filling the bag.
The “Sliver” Rule: Don’t skip cutting the back off the strawberry! There is nothing more frustrating at a party than a dessert that rolls off the plate.
Waste Not: Save the strawberry centers you hollowed out! Chop them up and stir them into your morning oatmeal or yogurt.
FAQs About Recipes
Can I use frozen strawberries? No. Frozen berries are too soft and won’t hold the shape needed for stuffing.
Why is my filling runny? Either the whipping cream wasn’t beaten to stiff peaks, or the cream cheese was too warm when you folded in the cream.
How many does this serve? Depending on the size of your berries, one batch of filling usually covers 24-30 halves (about 12-15 whole strawberries).

Deviled Strawberries (Cheesecake Filled)
A brilliant fusion of fresh fruit and cheesecake mousse, served as elegant bite-sized party treats.Ingredients
Equipment
Method
- Instructions in Bulk
- Prepare the Strawberries: Wash and dry the strawberries. Slice each in half vertically. Cut a tiny sliver off the rounded back of each half so they sit flat. Use a small melon baller to hollow out a shallow indent in the center of each half.
- Whip the Cream: In a medium mixing bowl, beat 1 cup of heavy whipping cream with an electric mixer until stiff peaks form (approximately 5 minutes). Set aside.
- Mix the Base: In a separate bowl, combine 8 oz softened cream cheese, 1/3 cup sour cream, 2/3 cup granulated sugar, 1 tsp vanilla extract, and 1 tbsp lemon juice. Beat with an electric mixer until the mixture is perfectly smooth and creamy.
- Fold and Combine: Using a spatula, gently fold the whipped cream into the cream cheese mixture. Move slowly to maintain the airy texture; do not use the electric mixer for this step.
- Pipe the Filling: Transfer the cheesecake mixture into a piping bag fitted with a star tip. Pipe a generous swirl into the hollowed-out "nest" of each strawberry half.
- Garnish and Serve: Sprinkle with 1/2 cup graham cracker crumbs immediately before serving to ensure they stay crunchy. Serve chilled.
Video
Notes
To ensure your cheesecake-filled strawberries are a 2026 party masterpiece, keep these professional tips in mind:- The "Stabilization" Secret: If your kitchen is warm, chill your mixing bowl and beaters in the freezer for 10 minutes before whipping the heavy cream. This helps the cream reach stiff peaks faster and stay stable longer.
- Avoid the "Bead" Effect: If your cream cheese is even slightly cold, it will create tiny white beads in your filling that can clog a fine piping tip. Make sure it is truly softened (pressable with a finger with zero resistance).
- Moisture Management: After hollowing out the strawberries, place them cut-side down on a paper towel for 5 minutes. This absorbs excess juice so the cheesecake filling doesn't "slide" off the berry.
- The "Soggy" Prevention: Never add the graham cracker crumbs more than 15–30 minutes before serving. The moisture in the cream cheese will turn the crumbs into mush if they sit for too long.
- Berry Selection: Look for strawberries that are heart-shaped and wide rather than long and narrow. They provide a much better surface area for the "deviled" filling.
- Scale the Sweetness: Depending on how sweet your berries are naturally, you can adjust the sugar in the filling. Taste the cream cheese mixture before folding in the whipped cream to see if it needs a touch more sugar or lemon juice.